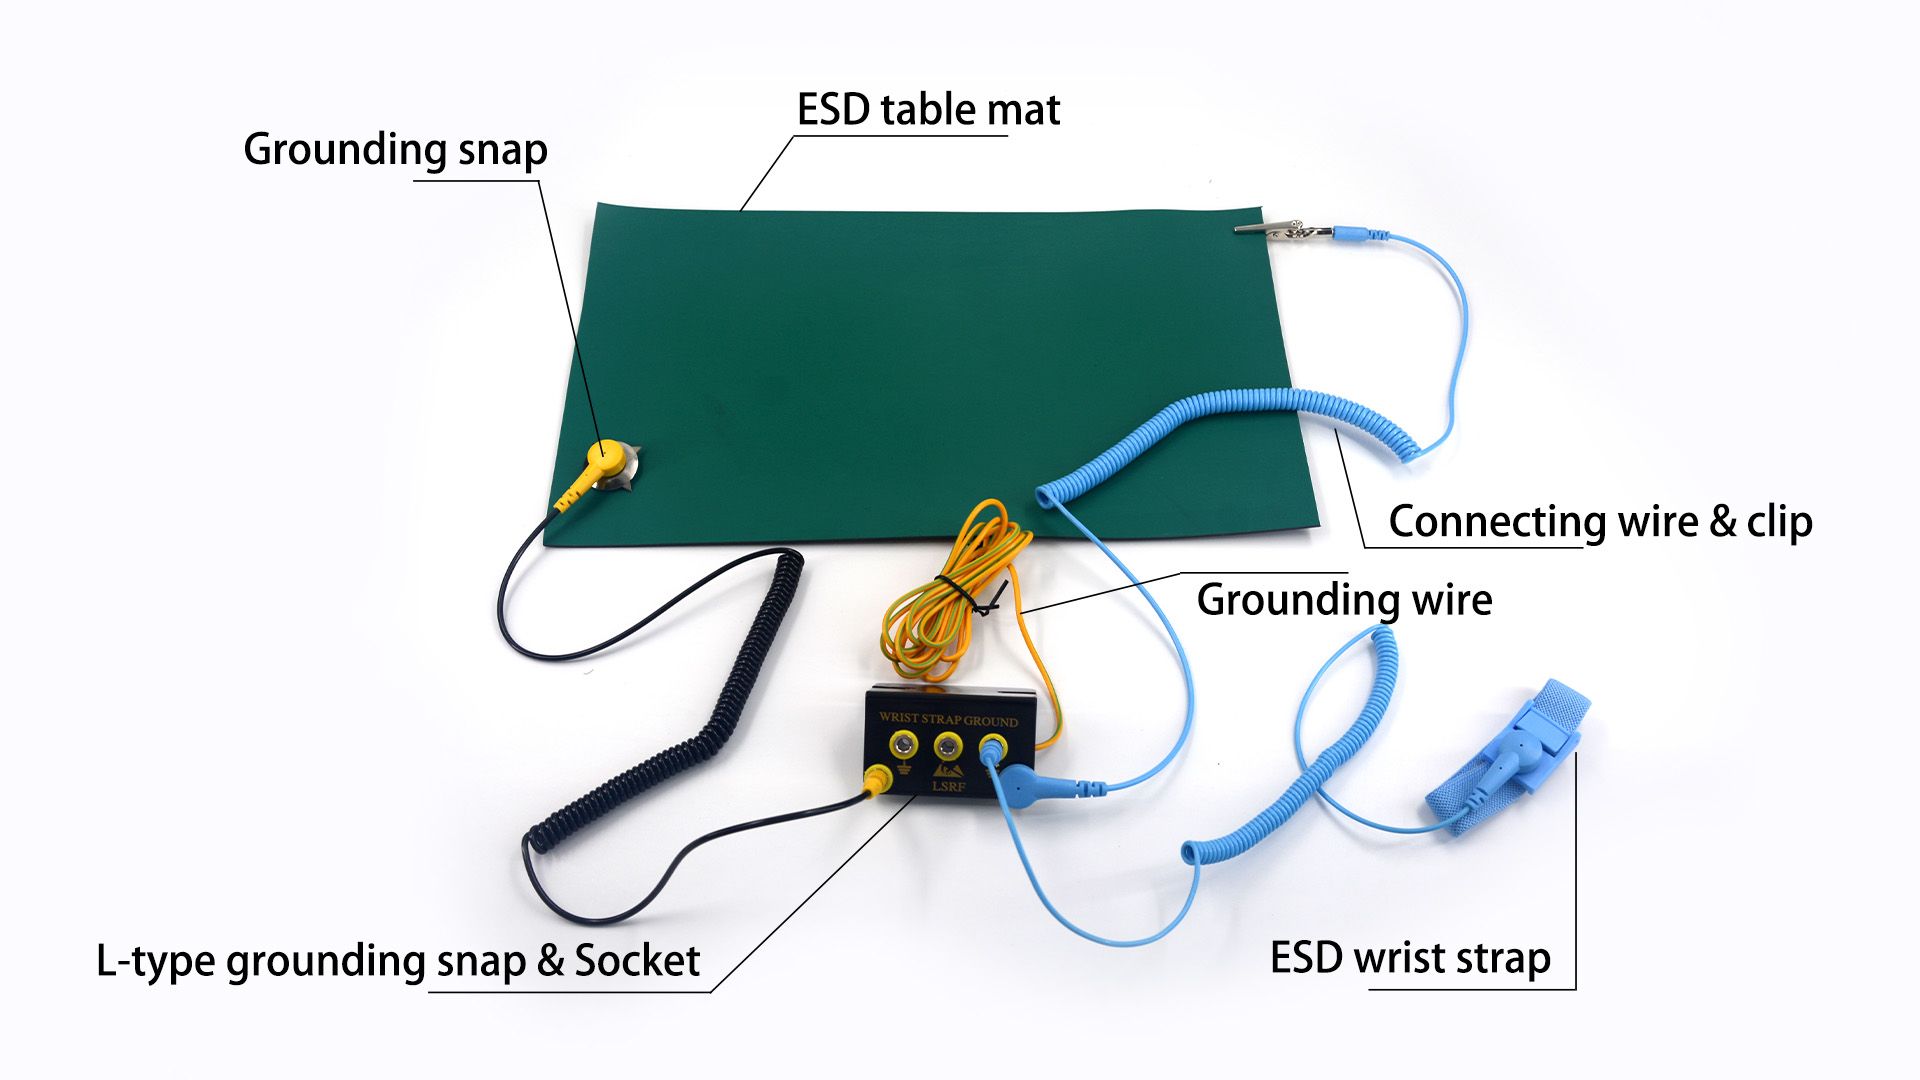
ESD grounding components include anti static table mat, grounding snap, grounding wire, connecting wire with clip, L type grounding snap and socket, and ESD wrist strap. This article explains each part and how to connect them for reliable static protection.
Why You Need a Complete Set of ESD Grounding Components
In electronics manufacturing, repair, and laboratory environments, a standalone anti static wrist strap or anti static table mat cannot form a complete static discharge path. Body static needs to travel through the wrist strap and grounding wire to the common ground point. Static on the workbench needs to pass through the table mat, grounding snap, and grounding wire into the earth. If any part is missing, static can still accumulate and damage sensitive components.
A standard ESD grounding system typically includes six core components: anti static table mat, grounding snap, grounding wire, connecting wire with clip, L type grounding snap with socket, and ESD wrist strap. The following sections explain the function of each part and how to use them together.
Detailed Function of Each Component
Anti Static Table Mat
The anti static table mat covers the workbench surface and provides a static dissipative work area. Its surface resistance is typically between 10⁶ and 10⁹ ohms, which allows slow static discharge without causing rapid discharge that could damage components. The mat usually has two layers: a light colored dissipative top layer and a black conductive bottom layer. The conductive layer needs to connect to the grounding snap to direct static to earth.
Grounding Snap
The grounding snap is a metal snap button installed at the edge of the table mat. Common types include round metal snaps and L type grounding snaps. The snap is fixed to the mat with screws or rivets, with its metal part penetrating the conductive layer to ensure reliable electrical contact. A standard configuration typically includes two grounding snaps on each mat, one on the left and one on the right side of the workbench, for multi station grounding convenience.
Grounding Wire
The grounding wire is the cable that connects devices such as the table mat and wrist strap to the common ground point. It is usually black or yellow green with stranded copper core, and has banana plugs, alligator clips, or ring terminals at both ends. The resistance of the grounding wire should be as low as possible, typically less than 1 ohm, to ensure rapid static discharge.
Connecting Wire and Clip
The connecting wire is used to connect the ESD wrist strap to the table mat grounding snap, or to connect the table mat to the main grounding wire. Clips include alligator clips, banana plugs, and push on clamps. Alligator clips are used to temporarily clamp onto grounding wires or mat edges, while banana plugs insert into the wrist strap socket or grounding snap receptacle. Select clips that grip firmly and have low contact resistance.
L Type Grounding Snap and Socket
The L type grounding snap is a right angle metal snap button installed at the corner of the table mat. Its protruding design makes it easier to plug and unplug the grounding wire and reduces stress on the mat edge. The socket part is usually fixed under the mat for quick connection with the grounding wire. The L type design is ideal for workbenches with limited edge space and reduces the risk of accidental disconnection.
ESD Wrist Strap
The ESD wrist strap is worn on the wrist and safely discharges body static through a built in resistor typically 1 megohm. The wrist strap consists of a conductive band, a metal snap, and elastic fabric, with the back side contacting the skin directly. The plug or alligator clip at the other end of the wrist strap connects to the table mat grounding snap or grounding wire. Ensure the wrist strap makes good contact with the skin and that the built in resistor is within the specified range.
Connection Method for a Complete Grounding System
Step 1 Install two grounding snaps on each side edge of the anti static table mat, making sure the snaps penetrate through to the conductive layer of the mat.
Step 2 Use a grounding wire to connect one grounding snap of the table mat to the common ground point under the workbench. For multiple workstations sharing one ground point, use a bus bar configuration.
Step 3 Use a connecting wire with an alligator clip to extend from the other grounding snap of the table mat for connecting the ESD wrist strap.
Step 4 Wear the ESD wrist strap on your wrist and adjust the tightness so the metal plate touches your skin. Insert the wrist strap plug into the banana jack of the connecting wire.
Step 5 Optional For mobile equipment or situations where an L type grounding snap is preferred, install the L type snap and socket and click the grounding wire into place.
Step 6 Use a multimeter to measure the total resistance between the wrist strap and the ground point. It should be around 1 megohm. Measure the resistance between any point on the table mat surface and the ground point. It should be between 10⁶ and 10⁹ ohms.
Common Mistakes and Precautions
Mistake 1 Installing only one grounding snap on the table mat. Dual snaps allow simultaneous connection of the wrist strap and the main grounding wire, reducing wear from repeated plugging and unplugging.
Mistake 2 Using ordinary wire for grounding. Ordinary wire has a thin copper core and lacks a durable outer jacket, making it prone to breakage. Use stranded soft copper wire with a flexible, abrasion resistant outer jacket.
Mistake 3 Wearing the wrist strap over a sleeve. The wrist strap must make direct contact with the skin. Insulating fabric blocks the static discharge path.
Mistake 4 Failing to check ground continuity. Before starting work each day, use a ground tester to confirm that the wrist strap and table mat have proper resistance values.
Mistake 5 Using low quality L type snaps. Some cheap products have thin metal plating that oxidizes easily, leading to poor contact. Choose gold plated or nickel plated models.
How to Select Qualified ESD Grounding Components
Anti static table mat Request a surface resistance test report. Thickness should be at least 2 millimeters. The mat should be heat resistant and solder resistant.
Grounding snap and L type snap Material should be stainless steel or nickel plated brass. Spring pressure should be moderate. The snap should maintain conductivity after 5000 insertion cycles.
Grounding wire Core cross section should be at least 0.75 square millimeters. Outer jacket should be abrasion resistant PVC or silicone. Length should be customized based on workstation distance.
Connecting wire and clip Alligator clip teeth should align properly and provide even clamping force. Banana plugs and jacks should fit snugly without looseness.
ESD wrist strap The fabric band should be wider than 20 millimeters. The metal snap should be secure. The built in resistor should be 1 megohm plus or minus 10 percent. A wrist strap with a replaceable battery tester is also acceptable.
Daily Inspection and Maintenance
Daily Use a wrist strap tester to verify that the wrist strap is conductive. Check the table mat surface for oil stains or damage.
Weekly Clean the table mat surface with a neutral cleaner or alcohol. Do not use strong solvents such as acetone. Check that the plugs at both ends of the grounding wire are secure.
Monthly Use an insulation resistance tester to measure the surface resistance of the table mat and the ground resistance of the grounding wire. Record the values and compare them with the initial readings. Replace any component that exceeds the specified resistance range.
Quarterly Check the riveted areas of the L type snap and grounding snap for oxidation or looseness. Re rivet or replace if necessary.